Packet Express overview
How to build a package
1 Package Descriptor
2 File List
3 Install Actions
4 Save
version 03 - 20/08/08
PacketExpress is a WireLess Deployer tool to make packages easily in a couple of minutes.
In order to help you to build a package, Packet Express is divided into tabs. Each tab contains specific information about the package.
| |
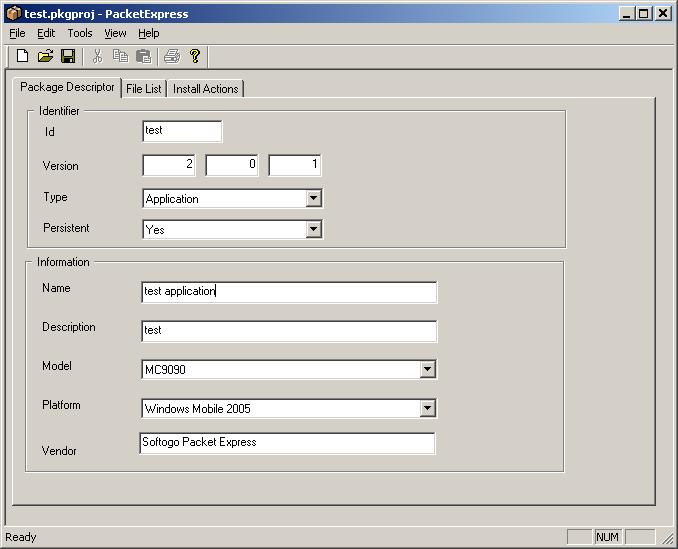
Click on "Package Descriptor" tab and complete all the fields.
| |
Identifier:
This frame contains identification data about the package and its working mode.
Id:
Package identification. This is the name for managing the package. A folder
having the same name will be generated on the PC (Console) in the following
location: "C:\Program
Files\WireLessDeployer\tools\PE\Pkg".
Valid characters for folder names on Windows must be respected. Special
characters are not allowed: / : < > \ * " ' ? . , & à á è é `ù,
etc. Try to use short names (see Save).
Version:
Version number allows to follow changes. Use only digits. All fields must be
filled.
Type:
"Application" unique option in the current version.
Persistent:
Here you can define if the package is cold boot persistent. In that case,
files should be placed on those folders of the PDA that are not erased after
cold boot. If you select "Yes", pay special attention to use only the
"flash" folders of the PDA.
Information
This frame allows to input a package description, which is useful for the
Console administrator and for the Client user. This data can be used for
defining package download conditions (Console).
Name
Package name that will be displayed to the Console administrator and to the
Launcher user, if the package contains an application for the Launcher.
Please, choose a name that is clear for the user.
Description
Miscellaneous data about the package. May be empty.
Model
PDA model where to install the package. This field has informative
purposes and it can also be used for defining package download conditions on the
Console (see Add,
delete, edit formulas). It is not mandatory that this field information
corresponds exactly to the PDA model to be used.
Platform
Operating System of the PDA. This field has informative purposes and it
can also be used for defining package download conditions on the Console (see Add,
delete, edit formulas). It is not mandatory that this field information
corresponds exactly to the PDA model to be used.
Vendor
This field will be displayed only on the Console.
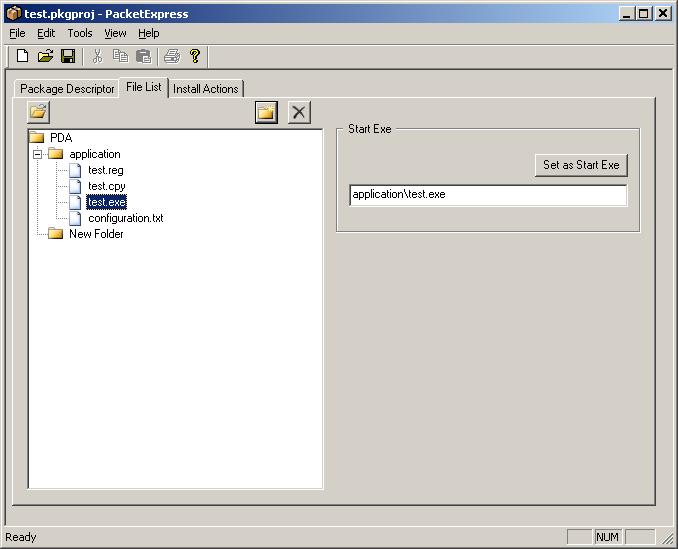
Click on "File List" tab.
"Files and folders" tree represents the structure of files and
folders and their future location on the PDA once the package is loaded.
"PDA" folder stands for the root of the tree. Other folders can
represent:
Use this button
![]() for creating the PDA
folder structure: To create a subfolder, select the folder where you want
to create the subfolder, then click on this button
for creating the PDA
folder structure: To create a subfolder, select the folder where you want
to create the subfolder, then click on this button ![]() .
You can use [F2] in order to rename the selected folder.
.
You can use [F2] in order to rename the selected folder.
In order to delete a folder from the package, select it and click on this
button ![]() .
.
In order
to add files to the package, select the folder of the PDA where to you
want to add files, then click on this button ![]() and browse for the file on your PC.
and browse for the file on your PC.
The files selected to be loaded into the PDA are copied in "C:\Program
Files\WireLessDeployer\tools\PE\Temp", so keep in mind that if these
files are modified on the PC, changes won't be applied to the package copy.
In order to delete a file from the package, select it and click on this
button ![]() .
.
| | "PDA"
folder stands for the root of the tree. Use this button Use this button |
Start Exe
On this field you can define an application, which icon will appear on the
Launcher.
Input a path to an exe file or to a link (.lnk). An icon for starting the
application associated to the package will appear on the Laucher (the
icon contained on the executable will be used).
It is possible to define a link towards an application loaded with the package or
an application already existing on the PDA.
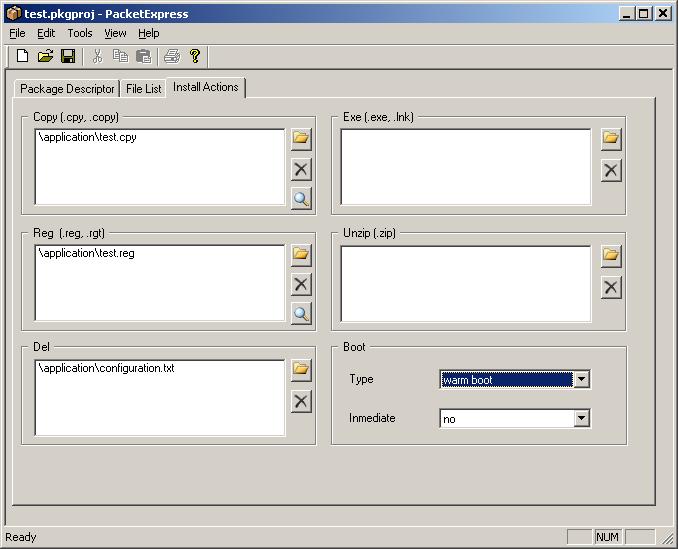
Click on "Install Actions" tab.
This tab groups all the actions which are performed by WireLess
Deployer Client when installing a package. These actions are performed on files
downloaded with the package or already existing on the PDA.
These actions are:
When installing a package, the PDA executes these actions ON THIS ORDER. There's one or several file extensions corresponding to each action. For example, ".cpy" and ".copy" files correspond to COPY action, ".reg" and ".rgt" files correspond to REG action, etc.
|
When loading the package, actions are performed on this order: ACTION-ZIP (unzip) ACTION-CPY (Copy) ACTION-REG (Reg) ACTION-EXE (Exe) ACTION-DEL (Del) |
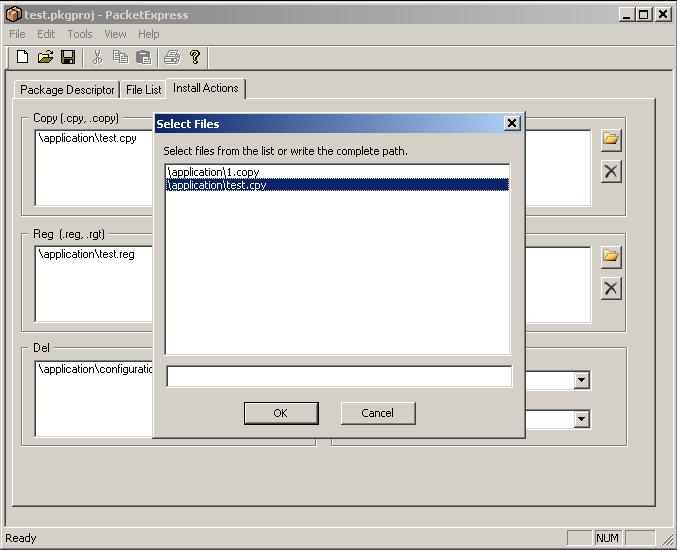
If you want to apply an action on a file, click on the frame of the action,
then use the browse button ![]() to add files.
to add files.
You can select:
Finally, go to [File] menu and save the project for the package to be generated.
Packet Express creates new folder called "Pkg", at the same level as PacketExpress.exe (usually "C:\Program Files\WireLessDeployer\tools\PE\Pkg"), where the new package will be saved.
You can save the package creation project file (.pkgproj) anywhere. It is advised to save projects in "C:\Program Files\WireLessDeployer\tools\PE".
The package is always created inside "\Pkg" folder and contains the package id on its name. For example, "MyIpView" package would have this folder: "C:\Program Files\WireLessDeployer\tools\PE\Pkg\MyIpView-1-0-0".
Don't move folders created this way.
In order to incorporate the new package to the WireLess Deployer Console, you must create a "zip" file of the package folder in "C:\Program Files\WireLessDeployer\tools\PE\Pkg". First, open the file explorer and locate "MyIpView-1-0-0" folder. Then, make right click on it to treat it with a data compression software, like "winzip". At last, place the zip file (MyIpView-1-0-0.zip) on the Console integration folder: "C:\Program Files\WireLessDeployer\New".
Then, on the WireLess Deployer Console, you can go to [Configuration / Add Packages / Look for new packages] in order to incorporate the new package to the Console (see "Add packages" on chapter VI of the Administrator's guide).
The new package will appear on "Packages" window. To be able to load it on a PDA, you must create a collection detailing which conditions a terminal must satisfy to download the package (see Create a new collection on chapter VI of the Administrator's guide).