contents / Chapter 4 / Chapter 6
This chapter describes the VT Configuration File Options. Chapter 6 describes the generic Configuration File Options.
The WT configuration file is a text file containing default values for WT and several keyboard sequences generated by the terminal. Some of these values can be dynamically modified by the Host system. The name of this file is always "_WTnCeVT.cfg". It's recommended to modify it only with iniEditor, an application included on the installation procedure.
The WT configuration file is a "Windows dot-ini-Like" text file, which includes:
The lines on the configuration file must be: Comments, Sections, Keys + Values or empty lines.
Sections group keys and values. Section names are in capital
letters surrounded by brackets, i.e.: "[VT_EMULATION]" denotes the
VT_EMULATION section.
The order of the sections in the file is not relevant.
Are keywords that have sense only in their own section, so they can't be moved from one section into another. Case (lowercase or uppercase) is not relevant for keywords, but uppercase makes them more readable. Keys must be followed by "=" sign and the value of the parameter: LocalEcho=No.
Values follow the keys and "=" sign. Each parameter expects the value in a fixed format (indicated with the parameter definition as "<format>"). Values may be empty in some cases.
Formats are:
<Yes/No>
Needs Yes or No value.
<string / xxxx>
ASCII text characters, delimited (or not) by " character. If the
string is delimited by ", the spaces (20h) are preserved, otherwise
they are ignored. xxxx indicates the units or the meaning of the value.
<hex-string>
In this format, three characters represent one final character.
There are three ways to supply "hex-strings" (each target character takes
always 3 source characters):
| Mnemonic | Format | Description |
|---|---|---|
| "Escaped" | "/HH" | A slash ("/" or "\") and a two-digits hexadecimal value, i.e.: \1B for character 27. |
| "Numeric" | "999" | Three decimal digits, i.e.: 065 for character "A". |
| "Alphabetic" | "..A" | Two dots and one alphabetic character, i.e.: ..X for character "X". |
Hex-strings may be delimited by " to be more readable.
<num / xxxx>
Decimal numeric value (0 - 9). xxxx indicates the units or the meaning of the
value.
<word>
Hexadecimal four-digits value, i.e.: A50F.
<uppercase letter>
One uppercase character, i.e.: N.
[VT_EMULATION]
This section groups the Terminal emulation level features.
[VT_LOGIN_X]
These sections group the Automated Login Options for host connection with
automatic response of user name and password to the host login, and a
supplemental user and code if necessary. Each "Login" section
corresponds to a "session" section (by index).
[VT_FNKEYS_ANSI]
This section groups the ANSI Function keys strings.
[VT_SFNKEYS_ANSI]
This section groups the ANSI Shift + Function keys strings.
[VT_CURKEYS_ANSI]
This section groups the ANSI normal cursor keys strings.
[VT_CURKEYSAP_ANSI]
This section groups the ANSI application cursor keys strings.
[VT_FNKEYS_VT52]
This section groups the VT52 Function keys strings.
[VT_SFNKEYS_VT52]
This section groups the VT52 Shift + Function keys strings.
[VT_CURKEYS_VT52]
This section groups the VT52 cursor keys strings.
[VT_FNKEYS_VT100]
This section groups the VT100/VT220 Function keys strings.
[VT_SFNKEYS_VT100]
This section groups the VT100/VT220 Shift + Function keys strings.
[VT_CURKEYS_VT100]
This section groups the VT100I normal cursor keys strings.
[VT_CURKEYSAP_VT100]
This section groups the VT100 application cursor keys strings.
[VT_SCANCODES]
This section groups the translations that associates a keyboard Scan Code with a
specific string.
[TRANSLATOR_X]
This section groups the translation tables (from ASCII to UNICODE)
for the character display.
[VT_FNBARCODES]
This section groups the options of barcode reading as FN keys.
This section groups the emulation features at Terminal level.
MsgFile=<string>
This feature is not currently implemented.
EscapeChar=<hex> (\1B)
Escape character for VT and ANSI Sequences. Normally this character is 1B, but
it may be changed if host system requires it. These changes apply only for
received escape sequences.
LocalEcho=<Yes/No> (No)
Do not echo locally characters keyed by user (normally, echo is done by host).
See also Telnet Options / TelOpEchoHost=.
Blink=<Yes/No> (Yes)
Yes=Map blink character attribute to reverse video.
No=Ignore this attribute.
Caps=<Yes/No> (No)
Yes=Force the keyboard to caps lock.
No=Let the keyboard "as is".
Lower=<Yes/No> (No)
Yes=Force the keyboard to lowercase.
No=Let the keyboard "as is".
TelxonEscSeq=<Yes/No> (Yes)
Yes=Manage or the specific Telxon escape sequences (see Telxon
escape sequences).
No= Ignore them.
RoiEscSeq=<Yes/No> (Yes)
Yes=Manage the specific ROI escape sequences (see ROI
escape sequences).
No= Ignore them.
HostBeeps= <Yes/No> (Yes)
Yes=Makes a beep when receives a BEL
(07h) C0 control character from the host.
BeepFile=<string> (\Application\critical.wav)
Either the full path name of a sound file (.wav) (only for terminals with sound capabilities as PPC2003 or
WM2005),
Or a digit: 0=extra short beep, 1=1 time error beep, 2=2 times error beep, and so on.
Sound files work on MC9090 (PPc2003 & WM2005), MC50, MC70 and PPT8800.
MC3000, MC3090 and MC9090 (WCE5) only support beeps.
TermWidth=<num / columns> (0)
Logical width of the emulated screen in columns. 0=uses default 80. Up to 80.
TermHeigth=<num / lines> (0)
Logical height of the emulated screen in lines. 0=uses default 24. Up to 25.
DestBksp=<Yes/No> (Yes)
When receiving a BS control character, cursor moves to left. In addition, if
this option is =Yes, the character under the cursor before it moves is deleted (blank).
CurKeysApp=<Yes/No> (No)
Yes=Cursor keys (Up, Down, Left and right arrows) send the "Application"
cursor keys sequences by default. Switch between "normal" ([VT_CURKEYS_XXX]) and "application"
([VT_CURKEYSAP_XXX]) cursor keys
sequences can be done by host (see also Terminal
Mode).
EnterCrNu=<Yes/No> (No)
Yes=By default ENTER key sends CR+NUL (0Dh 00h ) (telnet standard).
No=By default ENTER key sends CR (0Dh) only (DEC Standard).
ENTER key sequence may be also modified dynamically by host (see also Terminal
Mode).
CrNuIsCrLf=<Yes/No> (No)
Yes=When CR NUL is received (standard Telnet terminator line) WT performs CR and
LF
functions.
No=When CR NUL is received WT performs Only CR
function.
EndScanCode=<word / scancode> (0018 / Ctrl-X)
Scan code of the key that ends the current Telnet session. Ctrl-X is the
default key to end session.
UnlkScanCode=<word / scancode> (2200 / Func-Ctrl-G)
Unlocks the keyboard or the scanner if the application misses to send the unlock
escape sequence after the locking sequence.
Bits8Mode=<Yes/No> (No)
(Sent characters)
Yes=8 Bits Mode:
* CSI output sequence "\1B [" are translated in
"\9B".
* SS3 output sequence "\1B O" are translated in
"\8F".
See 7 and 8 Bits Mode.
No=7 Bits Mode, no translation.
This option may be dynamically modified by host (Select C1 Controls).
Ignore8BCtrl=<Yes/No> (No)
(Received characters)
Yes=Ignore C1 control character (80h to 9Fh) functions, and display them. This
option may be turned to =Yes for displaying special characters in non-DEC
fonts (like 437.fnt, 850.fnt or
852.fnt).
No=Process C1 controls and perform functions.
AnswerBack="<string / Id>"
([IP])
Answerback string sent to the ENQ
request. May be:
DefFrgColor= <num> (3)
Foreground color for the display. The values this feature can take are from 0 to
7.
0=Black
1=Red
2=Green
3=Yellow
4=Blue
5=Magenta
6=Cyan
7=White
DefBkgColor=<num> (0)
Background color for the display. The values this feature can take are from 0 to
7.
0=Black
1=Red
2=Green
3=Yellow
4=Blue
5=Magenta
6=Cyan
7=White
DoubleTap=<hex> (\0D)
String sent when the screen is double tapped. It is possible to configure the SipScanCode
to show the SIP Panel.
FunctionByTap=<Yes/No>
Yes=generates the corresponding function key when clicking on any text as "Fx"
on the display by touch screen.
No=Do not generate function keys by touch screen.
DragDisplay=<Yes/No> (Yes)
Enables the manual scroll.
DisplayMono=<Yes/No> (Yes)
For monochrome display terminals. Forces color to DefFrgColor/DefBkgColor values.
TabStop=<num> (8)
Amount of columns for tab stops. When pressing tab, the cursor will go to column
8,16,24, etc.
SipScanCode=<word / scancode> (0019)
Ctrl-Y to activate the "SIP" Keyboard - "SIP Panel".
SipExe=<string> (\windows\sipselect.exe)
Executable path of the SIP. If different than standard executable.
SipWindow=<string> (SipWndClass)
Windows class name of the SIP. If different than standard executable.
TranslatorType=<number>(1)
This is the display character translation mode.
0= DEC_VT: 7 bits, for DEC-VT52, DEC-VT100 and DEC-VT220 terminals.
1= PC_like: 8 bits, for DEC-VT52, DEC-VT100 and DEC-VT220 terminals.
2= ANSI: ANSI terminals.
3= No translator used. Mathematic conversion form ASCII to UNICODE.
See also XltType on TRANSLATORS section.
CursorKbdState=<Yes/No> (Yes)
The blinking cursor shape shows the keyboard state (unshift, shift, control, function, alpha).
No=The cursor blinks in reverse colors.
These sections groups the Automated Login options for host connection with
automatic response for username and password during the host sign-in
process, and a supplemental user and code if necessary.
It is possible to use this section to keep user and password for further use
(second login).
Each "Login"
section corresponds to a "Session" section (by index).
The section [LOGIN_0] corresponds to the section [SESSION_0], [LOGIN_1]
corresponds to the section [SESSION_1], and so on.
See also "AutoLog" in chapter 3.
Auto=<Yes/No>
Yes=When a successful connection to a host, WT waits for the "LogId="
string and sends the "Login=" string. Then waits for the
"PwdId=" and sends the "Password=" string. A
second login process is done if "UsrId" and "CodId"
strings are not empty. The control returns to WT user emulation.
Tmout=<num / seconds> (30)
Time (in seconds) that WT waits for "LogId=" or "PwdId="
before it fails.
LogId=<string>
String that WT waits for to send "Login=" string.
Login=<string>
The string that WT sends after receiving "LogId=" string.
The keyword [CAPTURE] means that the user input is captured to be sent in "User"
step later.
To add control characters use [\xx] syntax in hexadecimal. In this format, three characters
represent one final character.
PwdId=<string>
String that WT waits for to send "Password=" string.
Password=<string> ("wtpwd")
The string that WT sends after receiving the "PwdId=" string.
The keyword [CAPTURE] means that the user input is captured to be sent in "Code"
step later.
To add control characters use [\xx] syntax in hexadecimal. In this format, three characters
represent one final character.
UsrId=<string>
Optional. The string that WT waits for to send "User=" string.
User=<string>
Optional. The string that WT sends after receiving "UsrId=" string.
The keyword [RESTORE] means that previous input captured in "Login" step is sent.
To add control characters use [\xx] syntax in hexadecimal. In this format, three characters
represent one final character.
CodId=<string> ("code:")
Optional. The string that WT waits for to send the "Code=" string.
Code=<string>
Optional. The string that WT sends after receiving the "CodId=" string.
The keyword [RESTORE] means that the previous input captured in "Password" step
is sent.
To add control characters use [\xx] syntax in hexadecimal. In this format, three characters
represent one final character.
Terminator=<hex-string> (\0D)
Terminator of each sequence sent. May be empty.
In this format, three characters represent one final character.
This section groups the strings sent by ANSI Function keys. Function keys are generated pressing a [FUNC] key, then a numeric key. The default configuration file provides the standard strings for each terminal type.
If the field is empty, the key is ignored (has no function). If a string is supplied, it is sent. A translation of this string may be done if the terminal is operated in "8 Bits Mode" (see 7 and 8 Bits Mode).
There are three ways to supply function keys "hex-strings" (each target character takes always 3 source characters):
| Mnemonic | Format | Description |
|---|---|---|
| "Escaped" | "/HH" | A slash ("/" or "\") and a two-digits hexadecimal value: i.e.: \1B for character 27. |
| "Numeric" | "999" | Three decimal digits. i.e.: 065 for character "A". |
| "Alphabetic" | "..A" | Two dots and one alphabetic character. i.e.: ..X for character "X". |
KEY_F1=<hex-string> (\1B..[..M).
...
KEY_F0=<hex-string> (\1B..[..V).
KEY_F11=<hex-string> ("" empty).
...
KEY_F20=<hex-string> ("" empty).
This section groups the strings sent by ANSI Shift + Function keys. Shift Function keys are generated pressing [SHIFT] key, a [FUNC] key, then a numeric key. The default configuration file provides the standard strings for each terminal type.
KEY_F1=<hex-string> (\1B..[..Y).
...
KEY_F0=<hex-string> (\1B..[..h).
KEY_F11=<hex-string> ("" empty).
...
KEY_F20=<hex-string> ("" empty).
See also [VT_FNKEYS_ANSI] section for the "hex-string" syntax.
This section groups the strings sent by ANSI cursor regular keys. Cursor keys are generated pressing Up, Down, Left and Right arrow keys. The default configuration file provides the standard strings for each terminal type.
KEY_UP=<hex-string> (\1B..[..A).
KEY_DOWN=<hex-string> (\1B..[..B).
KEY_LEFT=<hex-string> (\1B..[..D).
KEY_RIGHT=<hex-string> (\1B..[..C).
See also CurKeysApp= Option, "Terminal
Mode" and "Translation
Routines" for switching between "normal" and "application" cursor
keys.
See also [VT_FNKEYS_ANSI] Section for the
"hex-string" syntax.
This section groups the strings sent by ANSI cursor "application" keys. Cursor keys are generated pressing Up, Down, Left and Right arrow keys. The default configuration file provides the standard strings for each terminal type.
KEY_UP=<hex-string> (\1B..O..A).
KEY_DOWN=<hex-string> (\1B..O..B).
KEY_LEFT=<hex-string> (\1B..O..D).
KEY_RIGHT=<hex-string> (\1B..O..C).
See also CurKeysApp= Option, "Terminal
Mode" and "Translation
Routines" for switching between "normal" and "application" cursor
keys.
See also [VT_FNKEYS_ANSI] Section for the
"hex-string" syntax.
This section groups the strings sent by VT52 Function keys. Function keys are generated pressing a [FUNC] key, then a numeric key. The default configuration file provides the standard strings for each terminal type.
KEY_F1=<hex-string> (\1B..P).
...
KEY_F0=<hex-string> ("" empty).
See also [VT_FNKEYS_ANSI] Section for the "hex-string" syntax.
This section groups the strings sent by VT52 Shift + Function keys. Shift Function keys are generated pressing [SHIFT] key, a [FUNC] key, then a numeric key. The default configuration file provides the standard strings for each terminal type.
KEY_F1=<hex-string> (\1B..?..q).
...
KEY_F0=<hex-string> (\1B..?..p).
See also [VT_FNKEYS_ANSI] Section for the "hex-string" syntax.
This section groups the strings sent by VT52 cursor regular keys. Cursor keys are generated pressing Up, Down, Left and Right arrow keys. The default configuration file provides the standard strings for each terminal type.
KEY_UP=<hex-string> (\1B..A).
KEY_DOWN=<hex-string> (\1B..B).
KEY_LEFT=<hex-string> (\1B..D).
KEY_RIGHT=<hex-string> (\1B..C).
See also CurKeysApp= Option, "Terminal
Mode" and "Translation
Routines" for switching between "normal" and "application" cursor
keys.
See also [VT_FNKEYS_ANSI] Section for the
"hex-string" syntax.
This section groups the strings sent by VT100 / VT220 Function keys. Function keys are generated pressing a [FUNC] key, then a numeric key. The default configuration file provides the standard strings for each terminal type.
KEY_F1=<hex-string>
...
KEY_F0=<hex-string>
KEY_F11=<hex-string>
...
KEY_F20=<hex-string>
See also [VT_FNKEYS_ANSI] Section for the "hex-string" syntax.
This section groups the strings sent by VT100 / VT220 Shift+Function keys. Shift Function keys are generated pressing [SHIFT] key, a [FUNC] key and a numeric key. The default configuration file provides the standard strings for each terminal type.
KEY_F1=<hex-string> ("" empty).
...
KEY_F0=<hex-string> ("" empty).
KEY_F11=<hex-string> ("" empty).
...
KEY_F20=<hex-string> ("" empty).
See [VT_FNKEYS_ANSI] Section for the "hex-string" syntax.
This section groups the strings sent by VT100 / VT220 cursor regular keys. Cursor keys are generated pressing Up, Down, Left and Right arrow keys. The default configuration file provides the standard strings for each terminal type.
KEY_UP=<hex-string> (\1B..[..A).
KEY_DOWN=<hex-string> (\1B..[..B).
KEY_LEFT=<hex-string> (\1B..[..D).
KEY_RIGHT=<hex-string> (\1B..[..AC).
See also CurKeysApp= Option, "Terminal
Mode" and "Translation
Routines" for switching between "normal" and "application" cursor
keys.
See also [VT_FNKEYS_ANSI] Section for the
"hex-string" syntax.
This section groups the strings sent by VT100 / VT220 cursor motion application keys. Cursor keys are generated pressing Up, Down, Left and Right arrow keys. The default configuration file provides the standard strings for each terminal type.
KEY_UP=<hex-string> (\1B..O..A).
KEY_DOWN=<hex-string> (\1B..O..B).
KEY_LEFT=<hex-string> (\1B..O..D).
KEY_RIGHT=<hex-string> (\1B..O..C).
See also CurKeysApp= Option, "Terminal
Mode" and "Translation
Routines" for switching between "normal" and "application" cursor
keys.
See also [VT_FNKEYS_ANSI] section for the
"hex-string" syntax.
This section groups the translations that associate a keyboard Scan Code
with
a specific string.
There are up to 12 "substitution strings" for Keyboard Scan Codes.
See also "Translation
Routines" in Appendix A and Keyboard
Test in Chapter 4 for scan code translation system.
SCC_00=<scancode>
...
SCC_11
Scancode of the pressed key (four hex digits).
STR_00= <hex-string>
...
STR_11
<hex-string> = String sent if the key is pressed.
See also [VT_FNKEYS_ANSI] section for the
"hex-strings" syntax.
This section groups the translation tables (from ASCII to UNICODE) for the character display. There are three different ways for translation:
DEC_VT: Uses three graphic tables:0, B and <. These are 128
character tables.
PC_Like: These are DOS pages (437, 850, 852). These are 255
character tables.
ANSII: The same pc_like tables are used (255 characters).
See TranslatorType in [VT_EMULATION]
section;
See Translation Tables for further information.
XltName= <string/name> ("Fnt_VTX.Cfg")
File full name.
XltType= <number>
Translation family.
0= DEC_VT: 7 bits, for DEC-VT52, DEC-VT100 and DEC-VT220 terminals.
1= PC_like: 8 bits, for DEC-VT52, DEC-VT100 and DEC-VT220 terminals.
2= ANSII: ANSI terminal.
See TranslatorType in [VT_EMULATION]
SECTION;
XltID= <string>
Table Identifier.
This section groups the options for barcode reading as FN Keys.
Keys will be obtained in 3 ways:
1) As Fn Keys (1 to 20)
2) As Keyboard Scan Code
3) As Hex characters sent to host
FnKeysByBc=<Yes/No> (No)
Look for prefix in barcodes to convert it into FUNCTION KEYS.
Function keys are sent as escape sequences following terminal configuration.
PrefixForFn=<string> (++)
Prefix to look for in the barcode.
The function keys will be 01 (F1) to 20 (F20).
Barcodes should be [++01] to [++20]
ScanCodesByBc=<Yes/No> (No)
Look for prefix in barcodes to convert it into KEYBOARD SCAN CODE.
Scan Code will be translated into function escape sequences by VT_SCANCODES section or
can be mapped as data keystrokes.
PrefixForSC=<string> (--)
Prefix to look for in the barcode.
The scan code will be 0001 to 3FFF (always 4 hex chars).
Barcodes will be [--0001] to [++3FFF].
Use Keyboard test option to see scan codes generated by keyboard.
HexByBC=<Yes/No> (No)
Look for prefix in barcodes to convert into HEX CHARACTERS.
Hex characters will be sent to host AS IS.
PrefixForHex=<string> ($$)
Prefix to look for in the barcode.
The scan code will be 01 to FF (always 2 hex chars).
Barcodes will be [$$01] to [$$FF]
It is possible to use the Character Map to see the characters available in a
selected font. The character map shows the following set of characters:
Windows, DOS and Unicode.
Unicode is the character codification in 16 bits developed by the Unicode Consortium
between 1988 and 1991. By using two bytes to represent each character, Unicode
allows to represent all the language written in the world through an unique set
of characters. At the present there are approximately 39000 of the 65.536
character codes possible of Unicode. The other combinations are available for
further amplifications.
This section displays the different type of tables and its corresponding translation tables used in the
.cfg
files.
The ASCII value to translate
is formed by the location in the table. The resultant Unicode value is the one
indicated in the corresponding position.
Note: The tables are constructed from the top to the bottom. The
first position is the first column and first file, the second position is the
first column and the second file, the third is the first column and the third
file...., etc.
The translation tables are constructed from left to right. It means that the
first position is the first column and first line, the second position is the
second column and first line, the third position is the third column and the
first line..., etc.
PC-Like Family
This family uses a zero based table (the first position corresponds to 0, as shown in the following figure) with 256 characters (from 0 to 255). There are three different configuration files of this family.
1. Fnt_PC437.cfg
The following is the "PC_Like 437" Table:
And the following is the PC_Like 437 translation table:
For example, if we want to translate the ASCII value 47 ("/")to Unicode, we can see that the resultant value is 002F. We can check that value with the character map Windows system tool:

This tool is used to create the translation tables. At the top of the screen, there is a combo box from where we select the corresponding font (in this case Courier New). At the bottom of the figure, the Unicode value for the selected character is shown (in this example 002F).
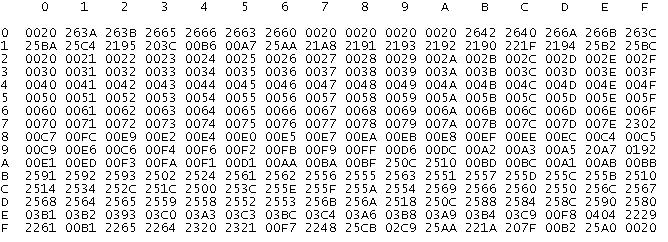
2. Fnt_PC850.cfg
The following is the "PC_Like 850" Table:
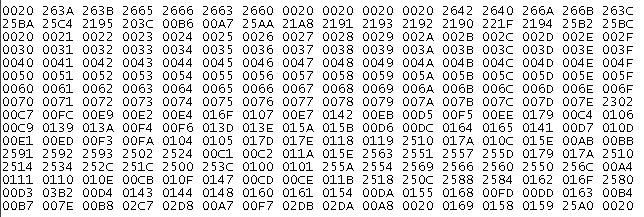
And the following is the PC_Like 850 translation table:
For example, if we want to translate the ASCII value 33 ("!") to Unicode, we can see that the resultant value is 0021.
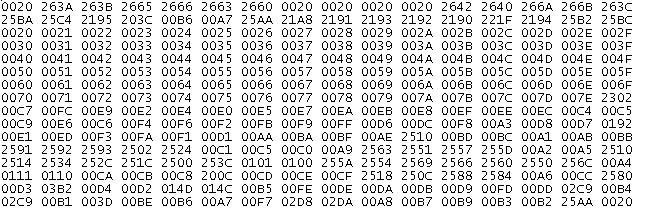
2. Fnt_PC852.cfg
The following is the "PC_Like 852" Table:
And the following is the PC_Like 852 translation table:
For example, if we want to translate the ASCII value 80 ("P") to Unicode, we can see that the resultant value is 0050.
DEC_VT Family
This family uses a zero based table (the first position corresponds to 0, as shown in the following figure) with 128 characters (from 0 to 127). The ASCII value to translate is formed by the location in the table. The resultant Unicode value is the one indicated in the corresponding position. There are three different configuration files of this family
1. Fnt_VT0.cfg
The following is the "DEC_VT 0" Table:
And the following is the DEC_VT 0 translation table:

For example, if we want to translate the ASCII value 33 ("!") to Unicode, we can see that the resultant value is 0021.
2. Fnt_VTB.cfg
The following is the "DEC_VT B" Table:
And the following is the DEC_VT B translation table:

3. Fnt_VTE
The following is the "DEC_VT <" Table:
And the following is the DEC_VT < translation table:
