Contents / Chapter 3 / Chapter 5
The IP address shown at the top of display is the terminal IP address.
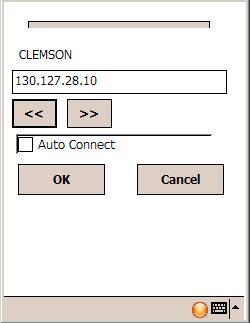
The IP address of the sessions that appear on the main screen can be modified on this screen.
The buttons << and >> allow to browse between the available sessions.
Activate "Auto Connect" check-box for the application to connect to the first session on the list.
To access this screen you must type the password which is in the
configuration file _WTnCe.cfg (by default the value is 234).
See the PwdWConf feature
in Chapter 6.
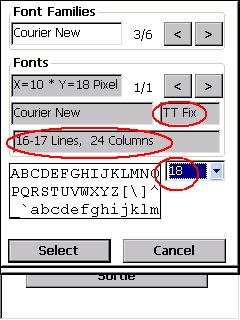
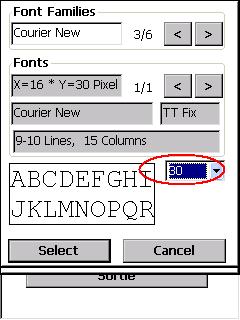
Font Families frame:
The font family name is displayed (in this example
Courier New).
You can browse through the font families list by tapping the ![]() and
and ![]() buttons.
buttons.
Fonts frame:
In this case there is only one font available, which is Normal Courier New.
10 x 18 are the dimensions of one character in the current selected size.
In other font families, where there are more than one font types (italics,
bold), you can browse them by tapping the ![]() and
and ![]() buttons.
buttons.
The font type can be TT Fix or TT Var:
- In a TT Fix type, all the characters have the same size, i.e. the
size is fixed.
- In a TT Var type, the characters have variable sizes, e.g.
character "i" has a smaller size on the display than character
"m".
NOTE: It is highly recommended to choose a fixed font in order to get a correct
display.
A label displays :
- The quantity of lines that will
contain the PDA display (here 16-17 lines - following the CommandBar is
shown or not).
- The quantity of columns that wiull contain the PDA display (here 24
columns).
with the selected configuration.
Font size: you can also select the font size by tapping ![]() on the combo box. In this case the size is 18.
on the combo box. In this case the size is 18.
|
This is a display box. It displays the characters with the format selected in the previous fields. |
To validate the values selected in the previous fields, tap the [Select] button.
After validation of the font to use, you need to modify the
configuration file (DISPLAYFONT) in order to set this configuration persistent.
Refer to Chapter 6 [DISPLAYFONT]
section for further information about configuring fonts.
You can adjust the font size in the emulator session, that allow to see the real application working:

Click on [Text Size +] or [Text Size -] some times until have the required size. Then check the selected size in the [Configuration] menu
After validation of the font to use, you need to modify the
configuration file (DISPLAYFONT) in order to set this configuration persistent.
Refer to Chapter 6 [DISPLAYFONT]
section for further information about configuring fonts.
This screen allows you to make a barcode scanning test. The code, the barcode type and length are displayed on the screen. EAN_8 and EAN_13 are two of the available symbologies.
Refer to the [Symbology] section in Chapter 6 for further information about barcode types.
To return to the main screen, tap the [OK] button.

This option allows you to perform a keyboard test.
The first value is the Windows CE SCAN CODE (untranslated scan code).
The second value shown on the screen is the WireLess TelNet scan code (traslated scan code). This second value is the one you have to use in translation.
The third value displayed on the screen is:
- If it is a function key, the string associated to the function key,
depending on the terminal type chosen by the user or negotiated with the Telnet
server.
- If it is a scancode, the character is displayed.
For example: [0x0036] 6
You can see 3270 / 5250 mappings.
To return to the main screen, tap the [OK] button.