Wireless Telnet for Windows CE "WTnCE" is a Telnet client for Symbol, Motorola, Unitech, Honeywell, Intermec, Datalogic, Psion, M3 Mobile and others.
WTnCE for 5250 supports the terminal emulations: 5251-11, and 3270.
WTnCE is a "fully-configurable" program by text configuration files, that allows local language customization, and special adaptation to various Telnet implementations, and expected terminal behaviors.
The configuration file is composed of "sections", to adapt:
WTnCE is shipped with standard configuration files that respond to the most popular configurations.
The installation is done in four steps:
1. Package installation: the WireLess TelNet package for Windows CE from the
WebSite. See
WireLess TelNet Installation.
2. ActiveSync: application to synchronize the information on your terminal
with the information on your host computer. See ActiveSync
installation.
3. iPDA: installing WTnCE on your PDA. See PC PDA
installation.
4. WTDnlCE: downloader the configuration files for Windows CE. See Downloading
the Configuration Files.
To install the WireLess TelNet pack, download from website, then
launch the installation program ![]() WTnCE52_FULL_Vxxx.exe.
WTnCE52_FULL_Vxxx.exe.
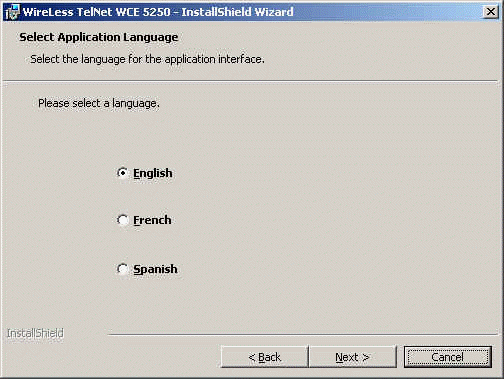
The following installation wizard screen appears:

Click Next.
You can select the language of the installation program.
Components:
The components of WireLess TelNet are:
| HHP "Terminals" | TelNet CE VT for Hand Held Products terminals. ( 7900 / 9500 ) |
| Symbol MC "Terminals" | TelNet CE VT for MC series ( 3000/ 3060 / 3090 / 3190 / 9000 / 9060 / 9090 / 9190 / 50 / 70 ) |
| Symbol VC "Terminals" | TelNet CE VT for VC series ( 5090 ) |
| Symbol PDA "Terminals" | TelNet CE VT for PDA series ( 8100 / 8800 ) |
| Symbol VRC "Terminals" | TelNet CE VT for VRC series ( 7900 ) |
| Intermec "Terminals" | TelNet CE VT for Intermec series( CK3 / CK30 / CK31 / CV30 / CV60 / i700 ) |
| Datalogic "Terminals" | TelNet CE VT for Datalogic series ( Rhino ) |
| PSC "Terminals | TelNet CE VT for PSC series ( Falcon ) |
| Honeywell "Terminals" | TelNet CE VT for Honeywell series ( 6100 / 7600 / 7900 / 9500 / 9900 ) |
| M3Mobiles "Terminals" | TelNet CE VT for M3 series ( Green / Sky ) |
| Janam "Terminals" | TelNet CE VT for Janam series ( XM60 ) |
| ATC "Terminals" | TelNet CE VT for ATC series ( 5000 ) |
| Unitech "Terminals" | TelNet CE VT for Unitech series ( HT660 / PA96X / PA500 / PA600 / PA900 ) |
| LXE "Terminals" | TelNet CE VT for LXE series ( MX8 / HX2 / VX6 ) |
| BITATEK "Terminals" | TelNet CE VT for BITATEK series( 8000 / 9000 ) |
| OPTICON "Terminals" | TelNet CE VT for OPTICON series( H15 / H19 ) |
| AML "Terminals" | TelNet CE VT for AML series ( M7225 ) |
| CASIO "Terminals" | TelNet CE VT for CASIO series ( DT-X7 / DT-X8 ) |
| Psion Teklogix "Terminals" | TelNet CE VT for Psion Teklogix series ( 7535 ) |
Full/ Custom Installation
When the WinCE 5250 is installed you can see this message when you click in the installation button.

By selecting Custom, you can choose the components to install. By default
some components are selected. You can disable or enable a component by clicking on ![]() .
.
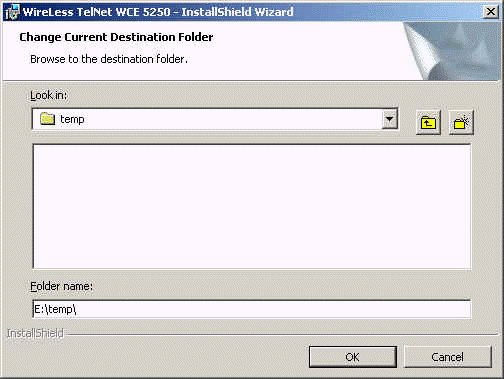
You can also change the installation directory by clicking the "Change..." button.
The application first needs to be installed on a desktop computer that has
Microsoft ActiveSync 3.5 or higher. This PC is then used to download the
application to the mobile terminal.
Using ActiveSync, you can synchronize the information on your terminal with the
information on your host computer. Changes you make on your terminal or host
computer appear in both places after you synchronize.
For downloading the ActiveSync software click here.
A PC to PDA installation procedure (chm) allows to install program and
configuration in the PDA from the PC.
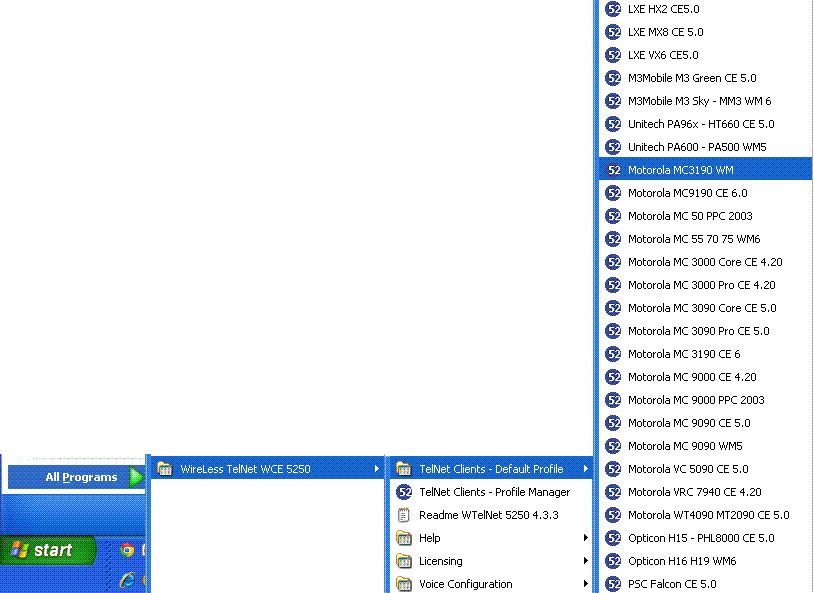
Go to "Start Menu / Programs / WireLess TelNet WCE 5250 / Default
Profile / "your terminal model".
An installation wizard screen appears with the following options:
In the first step you will be able to configure the network WiFi et TCP/IP in the PDA, choosing an Static IP or an Dynamic IP. See Network Configuration / WinCE Client. A button "Retrieve" allows you to keep the configuration of one PDA in the PC, to load further in one or more PDA's in persistent memory.
Network parameters need to be configured into the Host and Client systems.
PDA network parameters may be configured by PDA NETWORK CONFIGURATION.
Ask your Network Administrator for:
See Chapter 2 - Network Configuration and Appendix D for RF and Companion Mobile Utility.
On this step you are able to customize the PDA configuration thanks to IniEditor.
This application shows a detailed description about each option of the configuration, and allows to activate and deactivate options. The configuration can be made for two use modes: User and Administrator.
By means of a combo box, IniEditor allows to change the interface language, so the the helps and descriptions will be displayed in the chosen language.

Before pressing any of the Installation buttons, verify that the device is properly connected to the PC. An error message will be displayed if the device is not connected.
iPDA will be used to transfer the program files to the device.
The installation procedure presents the followings options:
Click Next. The application is installed on the PDA.
WTDnl is an application for uploading configuration files (.cfg) into portable terminals with Windows CE from a PC with WireLess TelNet Downloader (see appendix C).
The file transfer is done by radio way over TCP/IP.
See the WTDnl manual for further information about downloading the configuration files.

It is very important to verify which version of the program you have. The version number is displayed on the main menu.
On WTnVT V3.4.X and
previous versions there's two packages: "TRIAL" and "FULL".
You must install "FULL" package to access full use mode.
On WTnVT V3.5.0 and later versions
there's a unique package. It is necessary to input a license code on the
terminal for you to take full advantage of the program.
V3.5.0 and later versions
You must exit WTnVT (exit button + password) and launch it again.
At start up, it will request for a license code. You must scan the barcodes.
If the program doesn't request for a license code, it's because it has already
been charged.

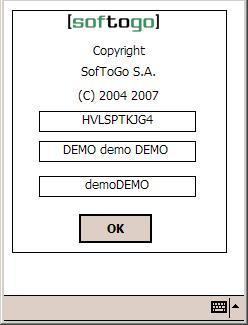
In order to use the program in DEMO mode, click on DEMO MODE button. When using the program in DEMO mode, it disconnects after 5 minutes and shows the message "DEMO MODE Disconnect". There's no other difference for this mode.
On the menu bar there's "ANSI" option (or "VT220" depends on the chosen emulation). If you click on that option you'll access "About..." menu. This menu displays the license codes or "DEMO demo DEMO":
Cold boot and uninstallation and installation don't
eliminate the license code from the terminal, since it is saved on the
flash memory.