A profile identifies a user or a group of users. Each profile has an associated
password.
The profile groups one or more WireLess Studio applications.
Each application has a title (displayed to the user) and an executable path.
The user is asked for the profile and password at sign-in. Then, the list
of available applications for this profile is displayed so the user is able to choose
among them for execution.
Profiles and applications are managed by the WireLess Studio Program Manager
(WSPm), which is the default executable file launched by the server. You can bypass the
sign-in process replacing the program manager with your own WireLess
Studio application.
The server administrator allows to modify the server behavior and the server
license.
7.1 Server administration control panel
|
Possible actions:
- Server shutdown
- Lock/Enable new connections
- Set the trace level
- Input the server license
- Manage the Server Connection Wizard
- Modify the Client Connection Settings
|
|
7.2 Server shutdown
|
| To stop the server process, select "Server shutdown" button, then click on "Select" button. |
|
Confirm (using GO button) or cancel the action on this dialog box.
The connection with the server is lost after shutdown.The shutdown process should take some time if there
are any active
connections. |

|
7.3 New connections
|
| You can forbid any new connection to the server by selecting "Lock New Connections" option.
Otherwise, to enable new connections (by default) select "Enable New Connections" option. Then,
in both cases, click on
"Select" button and confirm or cancel the transaction. |
|
7.4 Trace Level
|
You can manage the amount of information sent to the log files with
the trace options.
Select the desired option, then click on "Select" button.
Confirm or cancel the transaction. |
|
7.5 License
|
| When installed, WireLess Studio starts in demo mode for
evaluation purposes. |
|
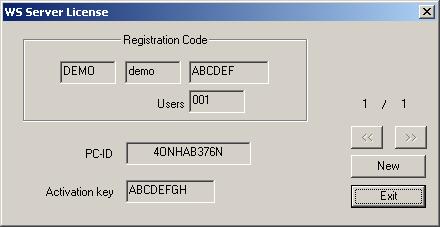
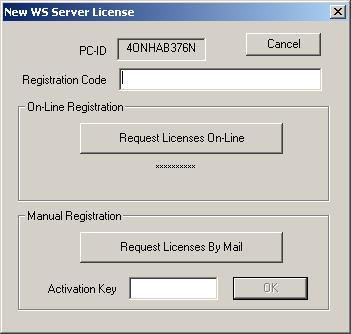
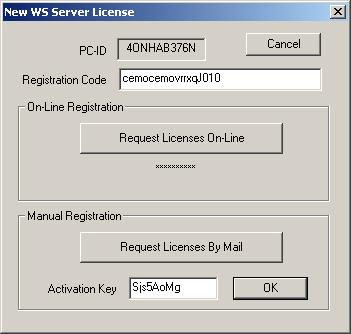
To activate all WireLess Studio's features you need to have a license
number. Press on "New" button for the license request screen to
appear. Type your Registration Code on "Registration
Code" field. The Registration Code is a number you are furnished with
when purchasing the product. |
|
There are two registration modes: on-line or by e-mail.
On-line registration: After typing your Registration Code press on "Request License
On-Line". If you get an "Activation Key",
your license has been activated.
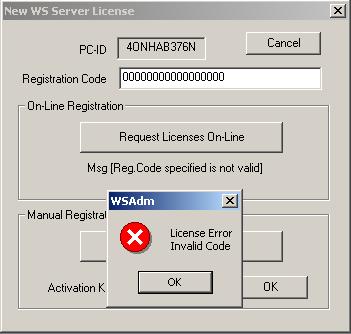
if you enter an invalid code, an error message will appear, indicating
that there was a mistake on the license request process. |
|
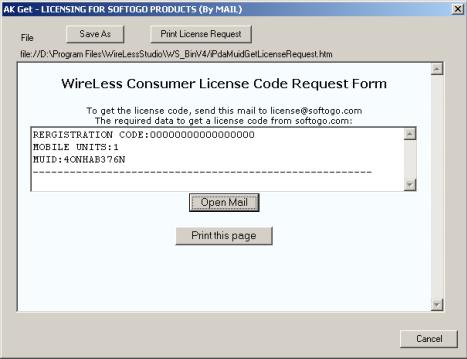
E-mail registration: After typing your Registration Code, press
on
"Request License by eMail". A form containing all the necessary
data for the license request will appear. DO NOT MODIFY THIS FORM.
Press on "Open Mail" to send the form to license@softogo.com.
"Print this Page" button allows to print the information. |
|
You will receive an Activation Key. Type it on "Activation
Key" field and press on "OK" to validate your new
license.
|
|
7.6 Server Connection Wizard
|
| The Server Connection Wizard allows the clients to find the WireLess
Studio Servers across the network, without knowing their IP addresses. (See
Network Configuration
/ Server Connection Wizard). To
enable this task, select "Enable task" check box.
The Connection Wizard ID is the identifier that allows to differentiate
or group the servers by the Client. The value "(hostname)"
sends the host computer name to the client. Otherwise the ID shown here is
sent.
The client will search for an ID or "all IDs"
("?").
- If only one server is found, the Client connects
automatically to it.
- If some servers with different identifiers are found, a menu
containing the different servers is displayed to the user.
- If some servers with the same identifier are found, the
Client connects automatically to the server that has less connections running (connection
balance).
The Wizard is used to perform multi-server Load Balancing
features, see Network configuration 7.2 Balance client connections in a multi-server environment |
|
7.7 Client configuration
|
| This dialog box allows to configure some client connection parameters.
Startup application (PM) (Program Manager) frame allows to manage
the application menu, profiles and passwords. You can replace this startup application
with another.
Inactivity time-out frame allows to automatically disconnect
the client if no RF transaction is detected on this time lapse (in minutes). 0 means "no
time-out". Daily Auto Shutdown Time allows to indicate the
time of the day when WireLess Studio is shutdown and all terminals are
disconnected. Short File Names check box allows
to configure the file naming mode used by WireLess Studio, long or short
(8.3) form. Use IP to Log enables to configure the log file name.
The name of the file that keeps the registry of client activity will
contain the client IP. For example, a terminal having 10.10.10.1 as IP
address will have a log file named "wst_10_10_10_1.log". WARNING:
Do not use this method if you have several WSt clients on the same PC,
because they have the same IP address. |

|