The Symphony Web Server is used to manage and administer several mobile devices connected to it. This manual will explain how to use several functions of the Symphony web console.
1 Add packages to the consoleOn the packages menu select the option Management and click on the button Package Upload.

On the new window click the Select button and look for the package file. Then press Upload.

The new package will be added to the list.
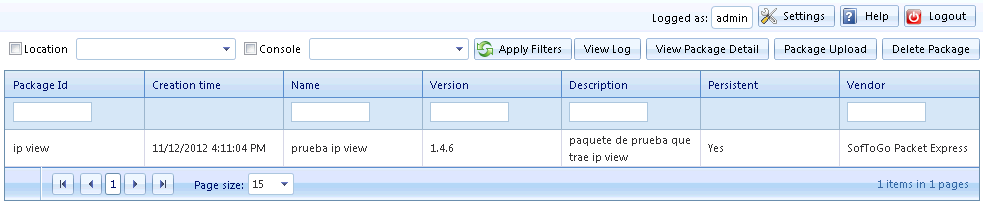
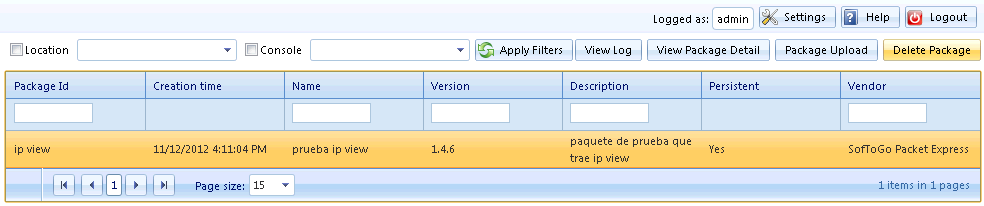
To eliminate a package from the Symphony console, go to the Packages menu and select Management, select the package that you wish to delete and click on the Delete Package button.
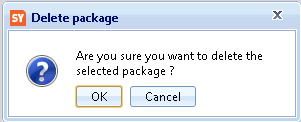
A confirmation message will appear, click on the button OK to delete the package.
On the Deployment menu, select the option Management from the Collections tree. Then click on the Create Collection button.

Next you will have to select a name for the collection and you can write a little description, after that click on +Create Collection.

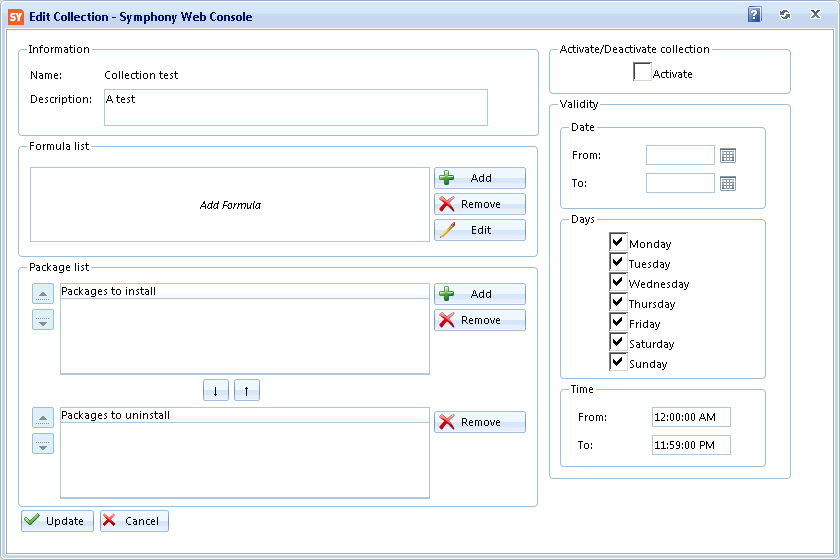
The new collection will be added to the list. Now you are able to configure the collection's data, just select the collection you wish to edit and click on Edit Collection. You will see a window where you can edit the collection's:
After you make all the necessary changes press Update and the collection will be updated on the console.
Go to Collections and click on Management, then select the Collection that you wish to add a package and click on Edit Collection.
On the window you will see a frame named Package List, click on the Add button from that frame.
You will see on a new window the list of packages on the console, to add any one of them just select it and then click on the + Add button.
The package added will appear on the list of packages to install, to save the changes click on Update.
Note: Deleting a package form a collection doesn't uninstall it from the client (see Uninstall packages from the client).
Go to Collections -> Management, select the collection you wish to edit and click on Edit Collection
On the Packages to Install list, select the package you wish to delete and click on the Remove button, the package will be eliminated from the collection.
To save the changes click on Update.
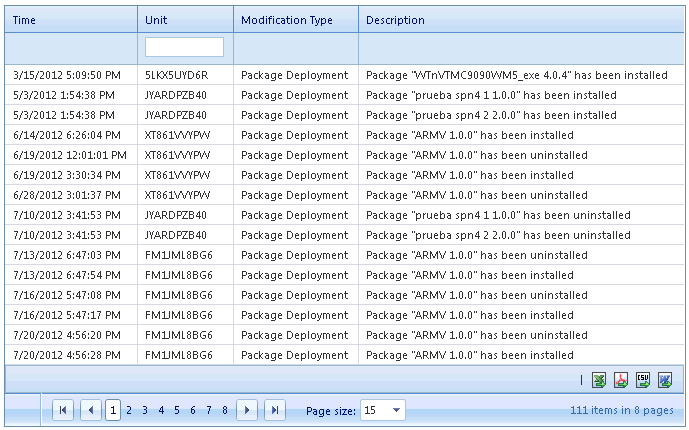
When a Package is deployed, the unit reports this change using an UPDATE command. When this command is processed, the Console saves a new "Unit Modification" of type "Package Deployment" that can be check on the Unit Modification History Page.
To do so, go to Monitoring - Unit Modification History.
To show a log of the deployment of packages we must enable the "Package Deployment" filter, located in the top section of this page, on the field "Modification Type", as shown in the picture below:
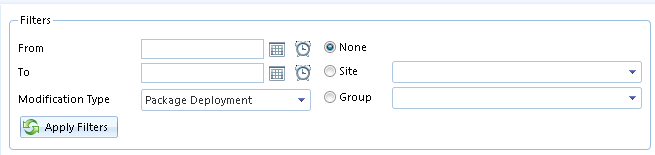
Once the filter has been chosen, we click on the "Apply Filters" button to enable it. The resulting page will show all the packages succesfully deployed, with the respective date, unit ID, and a short description of the deployment itself.
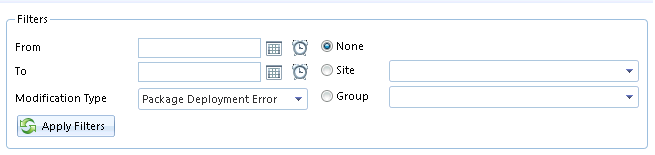
If we wish to see all the cases when an error happens when trying to deploy a package to a unit, we can set the "Modification Type" filter to "Package Deployment Error", as shown below:
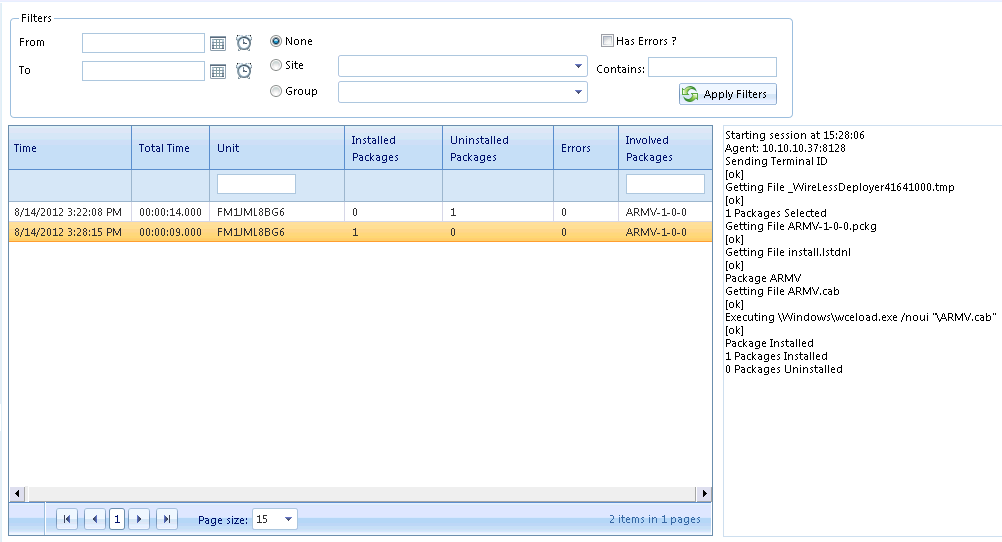
In case more detail is required about each Package's Deployment, a unit can be configured to upload the Deployment Log
To check the list of deployment logs, we must go to the menu Deployment - Deployment Log.
In this page, we will see all the packages that have been deployed, when they have been deployed, and to which unit, as well as a small log of the deployment itself..
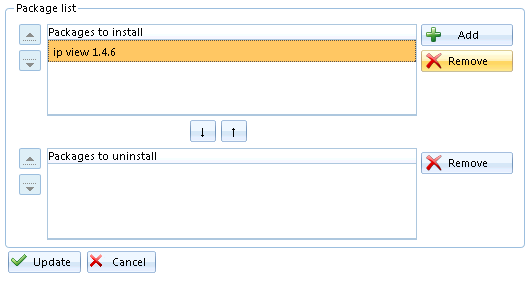
Go to Collections and click on Management, then select the collection that contains the package you want to uninstall on the PDAs and click on Edit Collection.
On the list of Packages to install select the package that you wish to delete
from the clients and use the button ![]() in order to move the package to the uninstall list
in order to move the package to the uninstall list

In order to save the changes click on the button Update.

To apply the changes on the PDAs you must update the units (see Update Mobile Units).
When you make a change on the Symphony Console you have to update the units to apply the changes on them, an update can be done from the client or from the console (see to update from the client), now we are going to show how to make an update from the console.
Manual Update:
To perform a manual update, go to Units and choose the Packages tab, next select the unit that you wish to update, you can select multiple devices with the key Ctrl, then just click on Update.

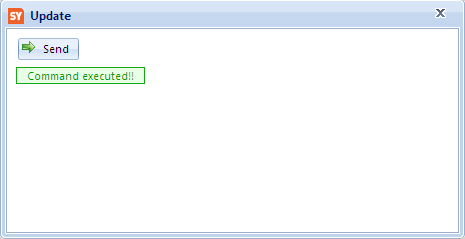
A message will appear, click on ->Send button.

The update will be executed, you can close the window with the X.

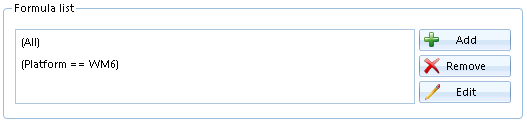
There's a frame called "Formula List", you'll be able to:
Press the button ![]() next to the Formula List and the following window will be displayed:
next to the Formula List and the following window will be displayed:
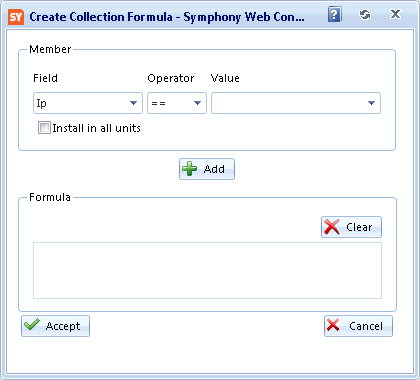
Field: Displays the valid fields the formula accepts: ModelName, Platform, Ip, Mac, UserID,
Hostname, MUID,
GROUP, SITE.
Operator:
Shows the valid operators that the formula accepts: <<, <=, <>, ==, >=, >>.
Value:
Displays the valid value that the formula accepts, if any.
Formula: Displays all the terms of the formula.
Add button:
Adds the term to the formula (if it's valid).
Clear button: Clears the formula.
Accept button: Allows to validate the formula and add it to the
Formula List.
After insert the formula and click the accept button you will see the formula on the Formula List.
Delete a Formula
To delete a formula you have to go to the Formula List, select
the field you want to delete and click on ![]() and the selected formula will be deleted, then click on Update to save
the changes.
and the selected formula will be deleted, then click on Update to save
the changes.
Edit a formula
Select the formula you wish to modify and click on the ![]() button. A window where you'll be able to make all the necessary changes will
appear.
button. A window where you'll be able to make all the necessary changes will
appear.
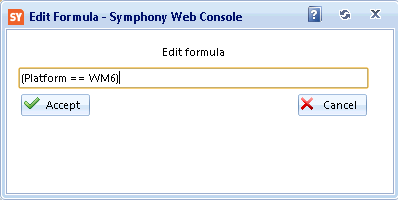
After editing the formula click on Accept button, you will be back to the Edit Collection menu, click on Update to save the changes.
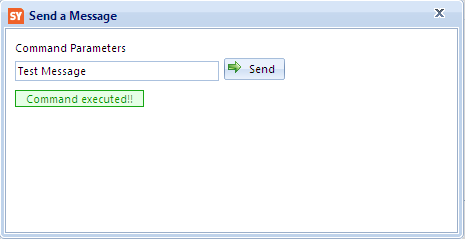
It is possible to send text messages to one mobile unit or all the connected mobile units. To do so, go to Units, select the unit that you wish to send the text message (you can select multiple devices with the Ctrl and Shift keys), click the Menu Actions and Choose Send a Message.

A window will appear, Write the text message on the Textbox and click on Send.

A message saying Command Executed!! will appear to notify that the message was successfully sent, now you can close the window.
This is how the message looks on the unit.

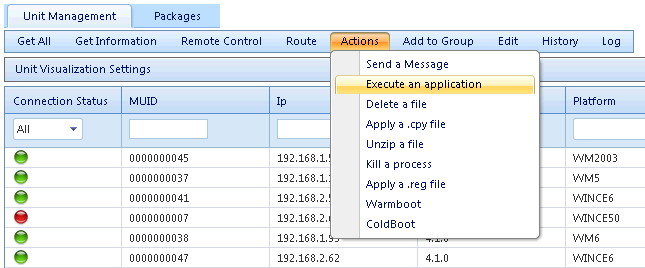
The Symphony Console allows you to not only send messages to the units, you can also execute commands on a mobile unit from the console.
Go to Units and select the unit on which you want to execute an action. Then open the menu Actions,
select the action you wish to do and complete it with the next parameters:
Execute an Application: Path and name of the program.
Delete a File: Path and name of the file.
Apply a .cpy file: Path and name of the .cpy file.
Unizip a File: Path and name of the file.
Kill a process: Name of the program.
Apply a .reg file: Path and name of the .reg file.
Warmboot: No parameter is required.
Coldboot: No parameter is required.
Press ![]() for the action to be executed on the mobile unit.
for the action to be executed on the mobile unit.
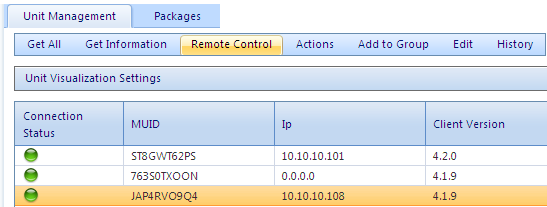
Symphony Remote Control enables real time control of the mobile unit. To use the Remote Control you must select the device you want to control on Units -you can only select between green units (connected), in principle. Then, press Remote Control on the menu.
Then the Remote Control Console will automatically open and you will be able to use the unit from the console.
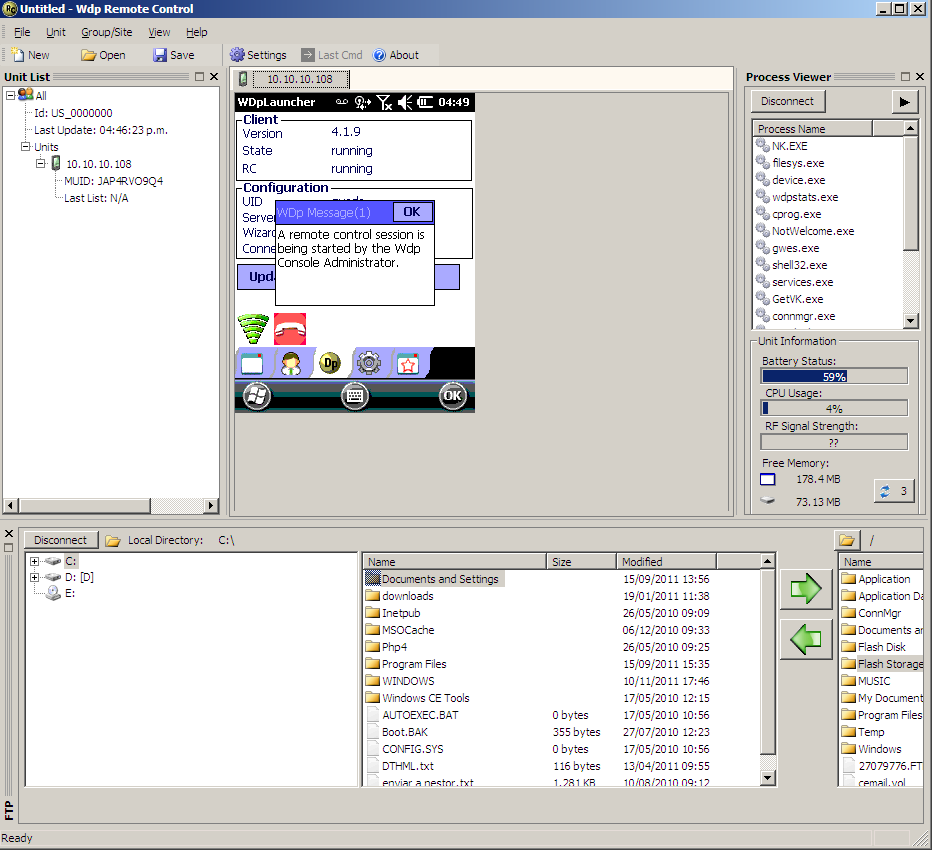
On the bottom of the window there's FTP, that displays folders and files. Those who belong to the PC are located at left and those who belong to the PDA are located at right. The panels make easier to find folders and files, and the arrows allow to transfer them from the PC to the terminal or vice versa.
On the top of the window there's the unit list, the unit viewer (at left) and the process viewer (at right). The unit viewer allows real time visualization and control of the PDA display. The process viewer displays the processes running on the unit, battery status, available memory, and storage memory.
Right clicking on a process perform the following actions:
Update List: Updates the process list.
End Process: Closes the application.
Kill Process: Kills the application.
A validity period defines when a collection can be installed. It is not mandatory to define a validity period for each collection but it may be useful to organize user's activity or to delay installation of a software update until the end of the day.
Only one validity period may be defined for each collection (between two dates, selecting only a start date or an ending date or none). Within that period you can select on which days of the week and between which hours it will be valid.
To set up a validity period, go to Collections, select the collection that you
wish to setup a validity period and click on the button Edit Collection.
You will find the Activate/Deactivate Collection and Validity sections.
Activating or deactivating a collection

The case selects whether a collection is active or not.
An inactive collection will never be included for updates.
This can be used to quickly disable a collection.
Defining a validity period
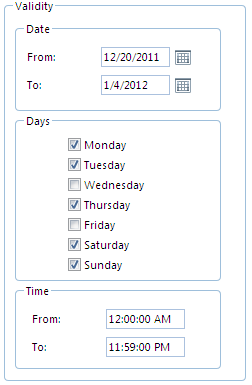
Date: Define a validity period between 2 dates. The collection will be valid between those dates.
If only one date is defined, the collection will be valid either to or from the selected date.
If no date is selected, the collection will be valid from the moment it is created until it is manually deactivated.
Days: Select on which days of the week this collection will be valid.
The collection will only be installed in the selected days.
Time: Select a validity timeframe within the day.
The collection will be valid within that timeframe.
All three criteria can be combined.
Click on the Update button to save the changes.
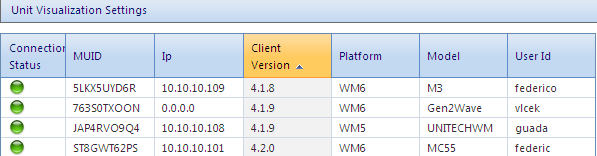
When managing more than a few units, it can be very useful to sort them according to different criteria. Ordering units helps in quickly checking the status of all the units with common characteristics (model, platform, etc).
The Symphony Console can sort the mobile units using any of these columns
Connection Status
MUID
Ip
Client Version
Platform
Model
User Id
To order all units using any of these columns, click on the column's name. An indicator (an arrow) will show if a column is being used as a sorting criteria (forward or backward) and the column name will turn orange.
Symphony allows to add shortcuts towards other applications on the Launcher screen from the client.
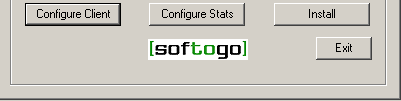
To create a shortcut, before install the Symphony/Wireless Deployer client, you have to change it's configuration. On the Client installer click on the button Configure Client, the inieditor will open.
On the Inieditor Select from the list the option Shortcuts and click on the button Add Field.

A list of parameters will appear on the Shortcuts list, this are the parameters of the Field Created, you have to complete them in order to create a new shortcut.
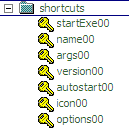
startExe00: Full path of the executable.
name00: Display name of the application.
args00: Program Arguments to be passed in command line.
version00: Version of the executable.
autostart: If you want, or not, to execute the application when the Launcher is started.
icon00: Full path of the application's icon.
options: Setup some options before the launch the application.
Once that the fields are completed save the configuration.
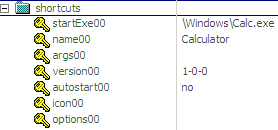
If you want to add another shortcut click again the Add Field button and complete the parameters of the new element.
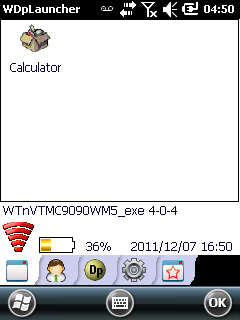
Then install the client, when you run the launcher you will see the new application on the launcher.
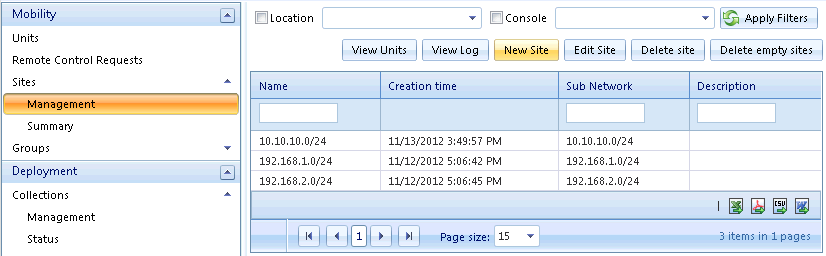
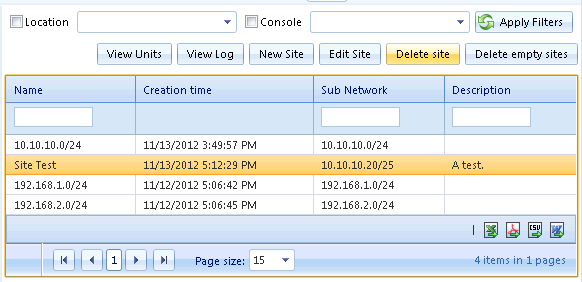
On the Menu Mobility select Management from the Sites submenu and you will see the list of sites available.
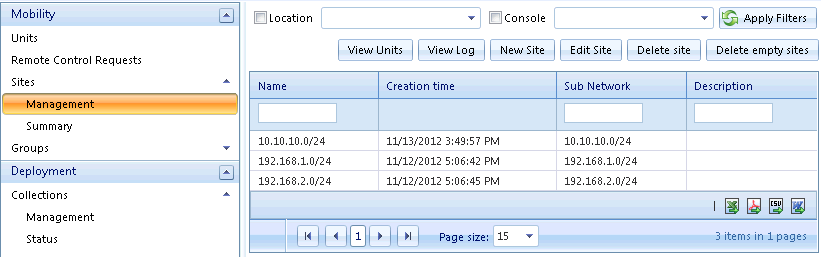
If you select Summary you will see sites and if you click one of them you will see the information of the units connected to it.

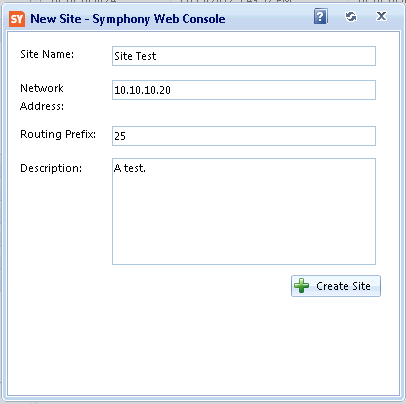
Create a Site
Sites can be created manually or automatically (if a new subnet is detected). To create a Site manually, go back Management on the Sites menu and select the button New Site.
A new window will appear, you will have to fill the blanks with the name of the new site, the network address and it's routing prefix, then click on +Create Site.
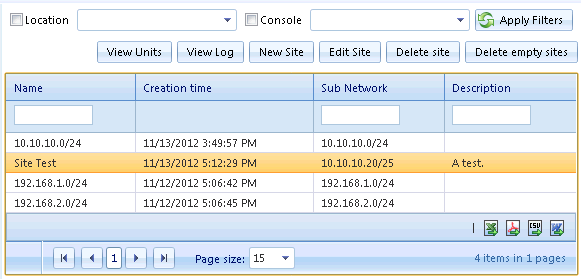
The new site will be added to the list.
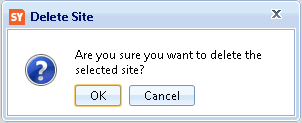
Delete a Site
To remove a site from the list just select it and click on the Delete Site Button.
A message will appear to confirm the action, click on OK to proceed.
Note: Deleting a site doesn't delete the units from the system, it just erases their link to the site that has been deleted.
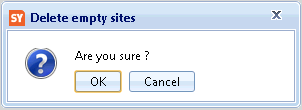
Delete Empty Sites
Also you have the option to delete the sites that doesn't have any units linked to it, use the button Delete Empty Sites on the Site Management. After a confirmation:
the console will proceed to eliminate all the empty sites.
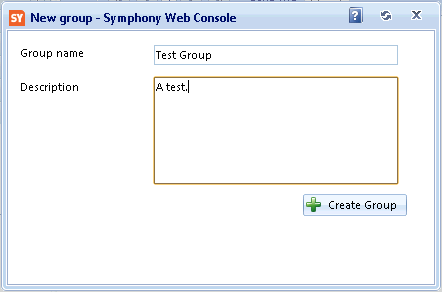
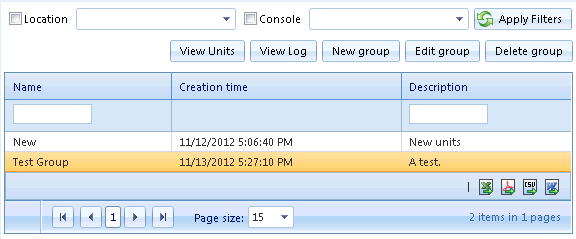
Create a Group
Groups must be manually created, to create a group you have to go to Management on the Groups menu, and click on New Group button.
A window will appear and you will have to write a name (the description is optional) and make a click on the +Create group button.
Then the group will be created and added to the list.
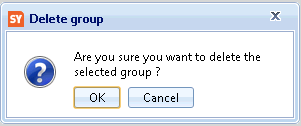
Delete a Group
To eliminate a group just select it on the Management screen and click on the Delete Group button.
You will have to confirm the delete, click on OK.
The group will be eliminated from the console.
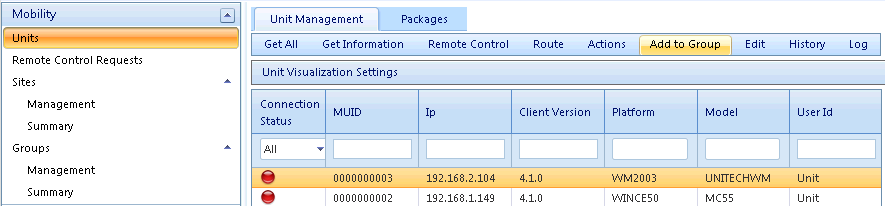
Add units to a Group
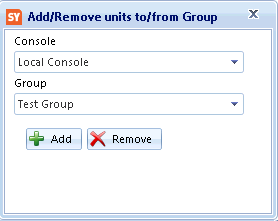
Fist at all go to the units screen on the Mobility menu, you will see the units displayed, select the unit you wish to add to a group (you can select multiple units with the keys Ctrl and Shift) and click on the button Add to Group, on the unit management menu.
A window will appear, you will have to select the Group where you want to add the console and select the console from the list, after that click on +Add. A message will tell you that the unit was successfully added to the group.
On the Management screen on the Groups menu you will see the list of groups and the state of the units associated to it just like with the sites.
To create a new user you have to be logged as Administrator.
On the administration Module go to the Create User page on the user menu.

You will se a form to complete, just fill all the blanks and select from the roles checklist the permits that the user will have. Click on Create User.

Now you can login with the new user created.